まつぼっくりのリース部分を作る
- Alidade

- 2022年12月6日
- 読了時間: 4分
更新日:2025年12月6日
investigator:Alidade
今日はHoudini Advent Calendar Apprentice 2022 Day 6です

今日はDay2の制作物を使ってキラリと光るリースを作ります。
昔あったアメリカ大陸横断鉄道の会社プルマンにちなんだカラーリングで行きます。

シーンファイルはこちらになります(飾りにラメが入った状態か液体状で選べます)
先に金のまつぼっくりの色を変えます

obj/MTBのノードをコピー&ペーストして
名前をExpress_d_Orient_Color_MTBに換えておきます。

次に内部にダイブしたらmatnetSOPの
下にあるマテリアルもコピーして
coatedmetalpaintマテリアルを
最低3つ増やしてください
BaceColorを変化させます。
設定は

ライトブルー(0.324,0.41,0.8)
ダーク・ターコイズ(0.075,0.1875,0.3)
シルバー(1,1,1)
※以上はブリティッシュ・プルマンの世界観を目指していますが、
正確なカラー指定ではないのであくまで気持ちの上での設定になります。


マテリアル変更が終わったら
Drop of Goldのカテゴリの名称を
Drop of Pullman Colorに変更し、
matnet1の階層から上がってください。

そしてscatterSOPから下に
boxSOPとattribrandomizeSOPを置いてcopytopointsSOPで繋げます。
boxSOPの中身はUniformScaleを0.025指定しましょう
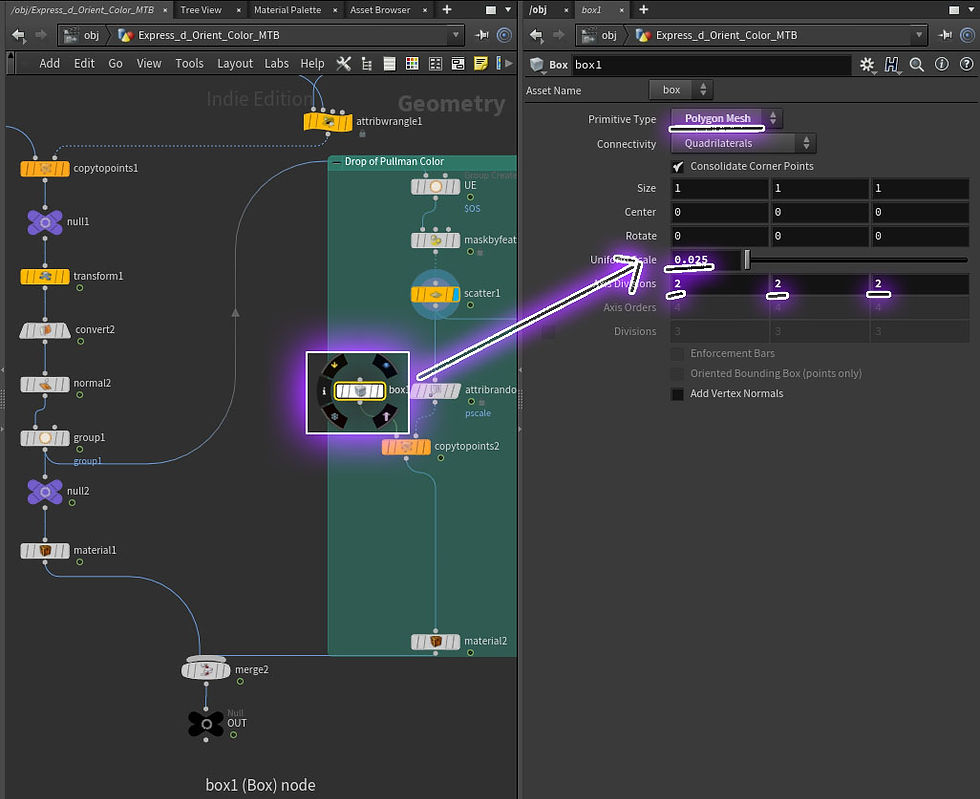

attribrandomizeSOP側の設定はAttributeNameにpscaleと入れDimensionsは2に設定し
MinValueを0.25、MaxValueを2.75に
指定します。
copytopointsSOPから下にmaterialSOPを繋げ2ndDayに作ったまつぼっくりの上にかかる
金色の水滴のような飾りを作る際に使ったscatterSOPから下のnormalSOPまで消し、

materialSOPに繋ぎ
マテリアルはシルバーにします(coatedmetalpaint2に指定)
/obj/Express_d_Orient_Color_MTB/matnet1/coatedmetalpaint2

mergeSOP下のOUT(nullとして出す)まで辿り青いタグをONにして
上の階層に上がります。
新規にGeoノードを作り、

WREWATHと名付け 中にダイブしたらobject_mergeSOPを呼び出します。

Object1に先ほどのOUTを呼び出してtransformSOPでY軸を-90度にします。

attribrandomizeSOPを使用しAttributeNameにP.yを打ちます
Dimensionは3、MinとMaxのValueは図の設定にします。

packSOPを繋げてcopytopointsSOPを呼び出して

繋げておきます。
lineSOPを置いてlengthは40程度、
Pointsは18にし DirectionはZ軸に1を入れてY軸は0にします。


resampleSOPの値は3.11にします

polywireSOPの太さはこちらになります 好みにあわせて良いと思うので
ちょうど良い感じにしてください。

polyframeSOPのBitangentにupを入れ下にBendSOPを入れます。

BendをEnableしたら 値を418ぐらいにします。
太さとのバランス調整をするので大体で良いです

attribrandomizeSOPを作りAttributeNameにrotを入力
Dimensionsは4にします。
attribwrangleSOPを下に置き、

f@pscale = pow(rand(@ptnum) , chf("addexp"));
と入力して作ったaddexpの値を0.188にします。
次はbendSOPからtransformSOPを引き延ばして使用します。

ScaleのY軸を1.75にしてattribrandomizeSOPを出し

AttributeNameに今度はpscaleを入れて Dimensionsを1にしてscatterSOPに繋げます。

ForceTotalCountは245程度で 丸いオーナメントのような物を置いた時に
綺麗な印象になるまで調整できるので、
今度はオーナメントスフィアを作ります。

copytopointsSOPを出したらsphereSOPを出し、materialSOPも下に繋げて
マテリアルはこのように指定します。

materialSOPに繋げ

copytopoints2にattribrandmize5を繋げます

mergeSOPを置いてcopytopoints1とcopytopoints2をマージしたら、
最後にnullSOPを出してOUT_WREATHに名前を変更します。

これでまつぼっくりのリースが出来ました! 以上で今日の制作は終わりです
最後までおつきあい下さり どうもありがとうございます。
【補遺1】
好みの方を選択してみたい場合、object_mergeSOPをコピー&ペーストして数を増やし
Object1の指定を/obj/Express_d_Orient_Color_MTB/OUT から
/obj/MTB/OUT に換えられるので
下にswitchSOPをつけてTransformSOPまで繋げてみてください

二つの候補のパターンが作れたので そこでスタイルの比較ができます。
【補遺2】
これだけのポイントをピン代わりに使ってオブジェクトを生やす事をしてしまうと
半透明じみたBox表示になってしまう問題が出る事があります。

その時は3Dモデルが表示されているビュー上にマウスのカーソルを置いてDを押下し
OptimizeタブのDistance-based Packed Geometry Cullingのチェックボックスを外すと
重くなりますがscatterで散りばめられた先のオブジェクトが見える様になります。
【補遺3】
今回の作例は昔、運行していたプルマンのパレス・カーに因んだ車両のテーマカラーを
標榜しています。現物はベルモンド ブリティッシュ・プルマン線で探してみてください
そこで使われている内装の調度品に紛れるような色合いを目指しています。


コメント